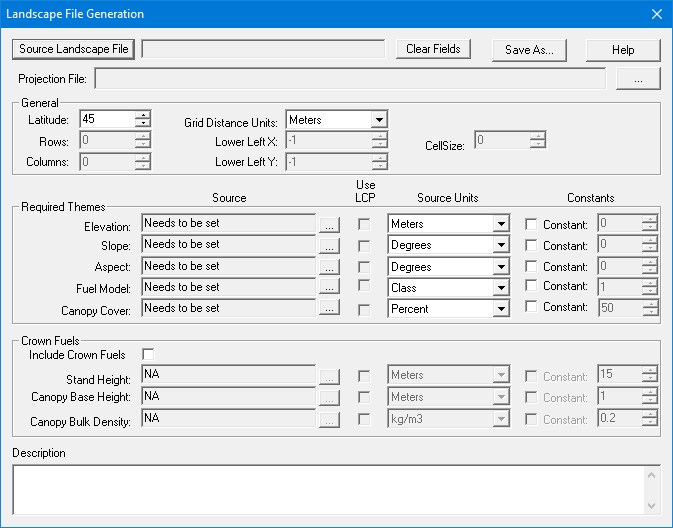
The landscape is generated by importing raster files using this "Landscape File Generation" dialog which is opened with the Landscape > Create Landscape File... command.
To create a new landscape from scratch first enter the latitude (whole degrees) of the themes in the Latitude spin box. Then select the units (Meters, Feet, or Kilometers) of the raster cells from the Grid Distance Units drop-down list.
To model surface fire in Farsite or FlamMap five spatial themes (elevation, slope,
aspect, fuel
model, and canopy
cover) are required in the landscape. An entry, either loading a grid
or a constant, is needed for each of
the required themes. Grids must be in the Arc/Info ASCII Grid (.ASC) or
GeoTIFF (.TIF) format. To load a grid theme click the ![]() button to the right of each theme Source
text box brings up a "Select Grid File" dialog.
button to the right of each theme Source
text box brings up a "Select Grid File" dialog.
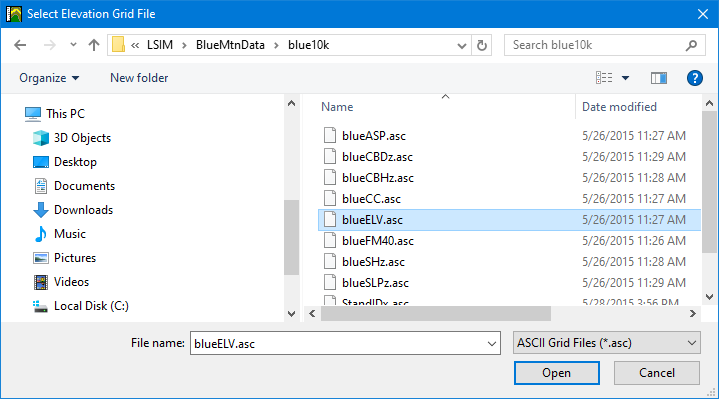
Navigate to the correct grid file, make sure the file name is displayed in the File Name: text box and click Open. If you don't see the GeoTIFF (.TIF) file you expect make sure to select the GeoTIFF Files (.TIF) or All Files (*.*) option in the file type drop down menu.
The file name selected will be displayed in the Source text box of the "Landscape File Generation" dialog. Select the correct units for each theme from the drop-down list to the right of the theme file name. Be sure these correctly describe the units of your data in each grid theme before saving the landscape, strange displays and weird run output can result from incorrectly setting the units.
If your units are something other than listed for that theme, you will have to reclassify or recompute values for that theme in a GIS before loading the theme. The Fuel Model theme also requires you to select if custom fuel models are present and/or if fuel model conversions will be needed.
A grid file or constant for elevation, slope, aspect, fuel model, and canopy cover, must be selected before the specified landscape can be created. A landscape cannot be saved without having a entry for all five required themes.
To utilize the torching, spotting, and crown fire model in FlamMap three additional Crown Fuel themes or constants are needed. To load data in the Crown Fuels section, first select the Include Crown Fuels check box. Then add the Stand Height, Canopy Base Height, and Canopy Bulk Density themes or constants as in the Required Themes group.
File Theme |
Required |
Default Units |
Alternate Units |
yes |
meters |
feet |
|
yes |
degrees |
percent |
|
yes |
degrees |
|
|
yes |
integer (0-255) |
|
|
yes |
percent |
|
|
no |
meters*10 |
meters, feet, feet*10 |
|
no |
meters*10 |
meters, feet, feet*10 |
|
no |
kg/m3*100, |
kg/m3, lbs/ft3, lbs/ft3*100 |
You have the option of using constant values for any of the GIS themes. By selecting the Constant check box at the far right of each theme, you can use spin box to insert constant values across the landscape instead of providing a grid theme. This can be useful for:
describing very uniform fuel or vegetation conditions,
describing the dominant fuel or vegetation coverage and then using the Landscape Editor to change small patches of fuel or vegetation conditions,
providing for later use of the Landscape Editor when fuel or vegetation conditions are better known. For example, Crown Base Height (CBH) is not typically available. It can be observed in the field for critical areas and then edited later.
Once you are satisfied with the themes and settings selected the landscape is saved by clicking the Save As... button at the top of the dialog box. The landscape can be saved in either Landscape File (.LCP) or GeoTIFF (.TIF) format. Remember that at a minimum the General and Required Themes groups need entries.
Click the Source Landscape File button (upper left in the "Landscape File Generation" dialog). A "Select Landscape File to Load" dialog appears.
Select the Landscape File to modify and click the Open button. To change the units of an existing theme simply select the correct one from the drop-down list.
To substitute a new grid file for the existing data
click the ![]() button next to
the existing data file and the "Select Grid File" dialog
box appears. Select the new file and click the OPEN button.
button next to
the existing data file and the "Select Grid File" dialog
box appears. Select the new file and click the OPEN button.
When finished adding the revised files click the Save as... button to display the "Select Destination Landscape File Name" dialog. Enter a different output Landscape File name if you want to retain the original Landscape File or select the original file name if you want to overwrite the file.
Press the ![]() button to close the "Landscape File Generation" dialog when
finished.
button to close the "Landscape File Generation" dialog when
finished.
Once a landscape has been created and loaded into a project individual landscape themes can be edited with Landscape > Edit Landscape menu item.