While ASCII wind grids can be used in FlamMap fire behavior runs, these grids are inconvenient for viewing with FlamMap. Wind Vectors, a combination of the Wind Direction and Speed grids displayed as an arrow, give a better interpretation of the modeled winds.
Wind vectors for loading as Auxiliary Wind Vectors are available in several ways
NOTE: Stand alone WindNinja contains more options that can create more accurate wind grids. The version of WindNinja embedded in FlamMap is a striped down version designed to run much faster.
|
|
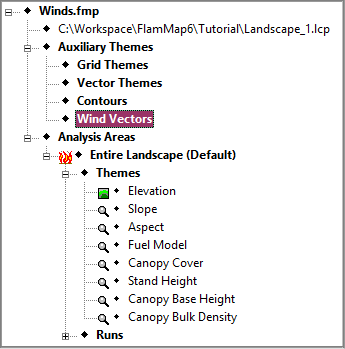
Right-clicking the ♦Wind Vectors item in the "Tree" pane displays this short cut menu. |
Selecting the New Wind Vector Theme command from the shortcut menu displays a standard Window's "Open" dialog box. Navigate to the appropriate folder, select the desired shapefile and click the Open button. Your project window displays the shapefile on your active grid theme in the "Display" pane. You may need to expand the
♦Wind Vector
tree item by clicking it's ![]() box to show the
box to show the ![]() ♦ yellowstone_30_270_100m item.
♦ yellowstone_30_270_100m item.
Remember, loading a wind vector shapefile as an Auxiliary Theme does not make it available for fire behavior calculations. To use wind grids in calculating fire behavior outputs enter the ASCII grid filenames on the Inputs Tab of the "Runs:" dialog box.
Selecting the Delete All command will remove all of the Wind Vectors from your FlamMap project.
Selecting the Help command will bring you to the Wind Vectors heading above in this online help system.
To temporally hide or display an individual Wind Vector, simply double click it's line in the "Tree" pane. A blue check mark "![]() " indicates the theme is currently displayed and a red "X" indicates it is currently hidden.
" indicates the theme is currently displayed and a red "X" indicates it is currently hidden.
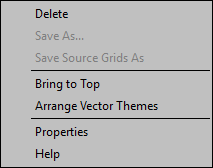 |
Right-clicking a individual Wind Vector item displays the following shortcut menu (the Save As and Save Source Grids As commands are not available for Wind Vector themes). With these commands you can delete an individual Wind Vector or change the way a Wind Vector displays. |
To delete all of the Auxiliary Wind Vector themes, right-click the ♦Wind Vectors items in the "Tree" pane and select Delete All from the shortcut menu.
To delete a single Wind Vector theme, right-click an individual item in the "Tree" pane and select Delete from the shortcut menu. A warning dialog box asks for confirmation of your delete request.
Selecting the Bring to Top command from the shortcut menu places the selected Wind Vector theme "on top" of any other visible vector and contour themes.
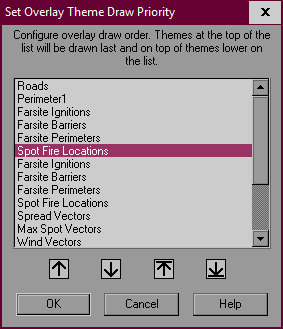
You can arrange the layering of all the visible vector and contour themes by selecting the Arrange Vector Themes command from the shortcut menu. This command brings up the following dialog box.
|
|
In the "Set Overlay Theme Draw Priority" dialog select the first theme you wish to re-arrange. Then use the arrow buttons below the theme list to move the selected theme up or down in the stack;
|
Wind Vector Themes use the "Wind Vector Legend" dialog box to control the display of these unique themes.