This lesson will show you how to control the FlamMap display by zooming, panning, contouring a grid theme, turning off themes, stacking vector themes, and saving the display image.
NOTE: These tutorial screen images were made using the default FlamMap legends. If the default legends have been changed your display screen may look different.
If you have closed your project or shut down FlamMap, you can reopen the project by selecting the File > Open command from the menu bar. In the "Open" dialog box select the file FirstTutorial.fmp and click the Open button. Your FlamMap project will display just the way it was when you last saved it.
Zooming allows you to change the image scale in the "Display" pane. The amount of Zoom is controlled with the View > Zoom Factor command, so select the View > Zoom Factor > 50% command as the zoom factor for this exercise. This command does not yet change the display, to do that you click on the Zoom In ![]() button on the toolbar. now the cursor appears as a magnifying glass with a plus sign when inside the "Display" pane.
button on the toolbar. now the cursor appears as a magnifying glass with a plus sign when inside the "Display" pane.
|
|
"Display" pane before zooming in. The rivers theme extending beyond the landscape is normal. If your "Display" pane does not look approximately like this, adjust the "Tutorial" window and "Display" pane sizes.
|
|
|
Click inside the "Display" pane with the magnifying glass cursor. The image scale will increase 50% and look like this. |
|
|
Click again inside "Display" pane and the image scale will increase another 50% and look like this. |
Now click the Zoom Out ![]() button on the toolbar and the cursor appears as a magnifying glass with a minus sign when inside the "Display" pane. Click the cursor once to return the fuel model grid image back to 50% larger than it's original scale.
button on the toolbar and the cursor appears as a magnifying glass with a minus sign when inside the "Display" pane. Click the cursor once to return the fuel model grid image back to 50% larger than it's original scale.
When the image in the "Display" Pane is larger than the window size, scroll bars appear on the bottom and right side of the pane. You can use these scroll bars or the pan function to move the magnified image to view the hidden parts. To pan, click the Pan ![]() toolbar button so the cursor appears as a hand when inside the "Display" pane. Now click and hold the cursor and moving the cursor inside the "Display" pane will move the image around.
toolbar button so the cursor appears as a hand when inside the "Display" pane. Now click and hold the cursor and moving the cursor inside the "Display" pane will move the image around.
To return to the normal cursor mode click the Identify Mode ![]() toolbar button.
toolbar button.
One of the neat features of FlamMap is the contouring function. We are all familiar with elevation contours but you can contour any of the grid themes. By using the contour function on different themes trying a variety of contour intervals you can get some different insights into the patterns of your landscape.
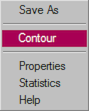
To contour the landscape elevation grid theme, first right-click the ![]() ♦ Elevation line in the "Tree" pane. This makes the landscape elevation grid the active theme and displays the following shortcut menu.
♦ Elevation line in the "Tree" pane. This makes the landscape elevation grid the active theme and displays the following shortcut menu.
|
|
Select Contour to bring up the "Contouring" dialog box. |
|
|
Note that the "Contouring" dialog shows the range of the elevation across the landscape. Select a contour interval as 250 in the Contour Interval: spin box and click the OK button. Remember the units for this elevation theme are meters. The new contour is automatically displayed in the "Display" pane. It is loaded as an auxiliary theme in the ♦Contours tree item. |
You can temporarily turn off vector and contour themes. Since only one grid theme is displayed at a time, turning off grid themes is not available.
To turn off the Roads vector theme double-click the ![]() ♦ Roads item in the "Tree" pane to display to hide the Roads vector theme. The
♦ Roads item in the "Tree" pane to display to hide the Roads vector theme. The ![]() in the item changes to a X to indicate the theme is hidden. Double-click again to display the Roads vector theme in the "Display" pane.
in the item changes to a X to indicate the theme is hidden. Double-click again to display the Roads vector theme in the "Display" pane.
Add several more vector themes to your display, 2017_CLEAR.shp, Roads2.shp, and Treatment1.shp are all found in the Tutorial folder. Select the New Vector Theme command from the ♦ Vector Themes shortcut menu and add one at a time, or use the standard Windows multiple file selection options.
When you have several complex vector and/or contour themes your display can become cluttered. There are several ways of simplifying this situation;
The simplest way to change the stacking order, especially if there are just a few vector themes, is by bringing one to the top. Right-click the ![]() ♦ 2017_CLEAR line in the "Tree" pane to display the following shortcut menu.
♦ 2017_CLEAR line in the "Tree" pane to display the following shortcut menu.
|
|
Select the Bring to Top command and the 2017_CLEAR polygon will display "on top" of the elevation contours and river themes. |
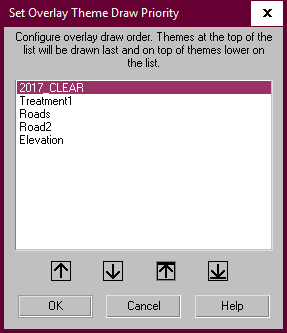
If you have lots of vector and contour themes you can arrange them all at once with the Arrange Vector Themes command. Right-click any of the vector or contour themes in the "Tree" pane and select the Arrange Vector Themes command from the shortcut menu. The "Set Overlay Theme Draw Priority" dialog box is displayed.
|
|
This dialog box works by selecting one of the themes and moving it with the arrow buttons. Select the 2017_Clear contour theme. Now click the top arrow button Next select the Elevation theme and click the down arrow button Your themes should now be close to the following order;
|
Click the OK button to close the "Set Overlay Theme Draw Priority" dialog box.
Even if you plan to continue now with this tutorial, you should save this project by following the procedures in the first lesson. Keep the project name FirstTutorial.fmp.
This concludes the basic lessons, you can now more on to tutorials for FARSITE simulations or FlamMap runs.