This lesson will lead you through a simple FlamMap run where you will create flame length, rate-of-spread (ROS), and crown fire activity maps. While this lesson shows you the simplest way to generate FlamMap output, the optional input and output settings are also easy. In FlamMap Lesson 3 a weather stream (.WXS) file is provided so you can utilize dead fuel moisture conditioning in FlamMap and produce additional fuel moisture output maps.
If you have closed your project or shut down FlamMap, you can reopen the project by selecting the File > Open command from the menu bar. In the "Open" dialog select the file FirstTutorial.fmp and click the Open button. Your FlamMap project will display just the way it was when you last saved it.
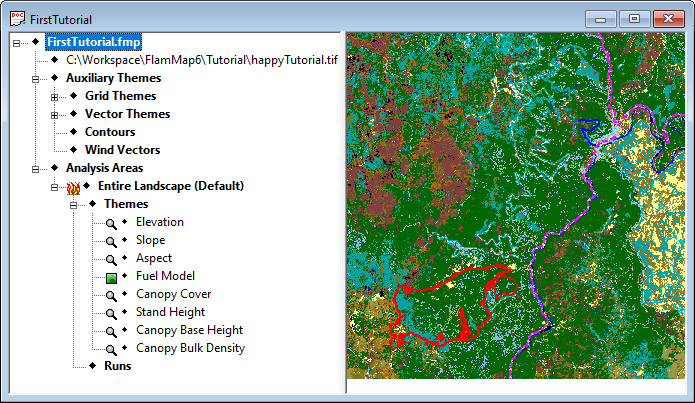
Do some changes to your project window as shown below. Make the Fuel Model theme the active grid theme, select the View > Full View command, and make the "Tree" pane taller so there is some space below the last item. You will be adding more items to the tree in this lesson.
Right-click on the ♦Runs line (currently the bottom item) in the "Tree" pane to display this shortcut menu:
|
|
Select the New FlamMap/MTT/TOM Run command from the shortcut menu to open the "Run:New Run" dialog. |
![]()
First thing; change the Run Name: to "Basic FlamMap". If you keep accepting the default "New Run" name, it won't take long to get lost in a pile of "New Runs".
Click the  button to display several Fuel Moisture File (.FMS) options, select the Open FMS File... option. An "Open" dialog appears, navigate to the C:\...FlamMap6\Tutorial\ folder and select the "ERC97th.FMS" file and click the Open button. An edit dialog displaying the initial fuel moistures appears, no edits are needed for this tutorial so simply close the dialog with the
  button.
There are no custom fuel models in this landscape so you can ignore the Use Custom Fuels (*.fmd) option.
In the Winds group make sure the Wind Blowing Uphill radio button is selected and change the Wind Speed (MPH @ 20'): spin box to "17" and the Azimuth (Degrees): spin box to "270". Remember, these are the winds 20 feet above the tops of the tree crowns.
With the Wind Blowing Uphill radio button selected the wind direction used in the fire behavior calculations will be based on the aspect theme for each cell in the landscape. This will allow comparison of the maximum (given the conditions) fire behavior for every cell. Adjacent cells where sharp changes in topography occur will have very different wind directions. Your Winds group will look like this;
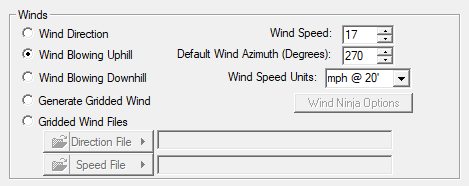
Note cells with no aspect use the direction from the Azimuth (Degrees) spin box.
The Foliar Moisture Content (%): spin box default is 100, this is a realistic moisture content for conifer foliage during an above average fire season. Select Scott/Reinhardt(2001) from the Crown Fire Calculation Method drop-down list.
The Canopy Characteristics area will look like this;

In the Fuel Moisture Settings group box make sure the Use Fixed Fuel Moistures from Fuel Moisture File radio button is selected. The remaining options in this group are related to using the fuel moisture model to modify the dead fuel moistures and will not be used here.
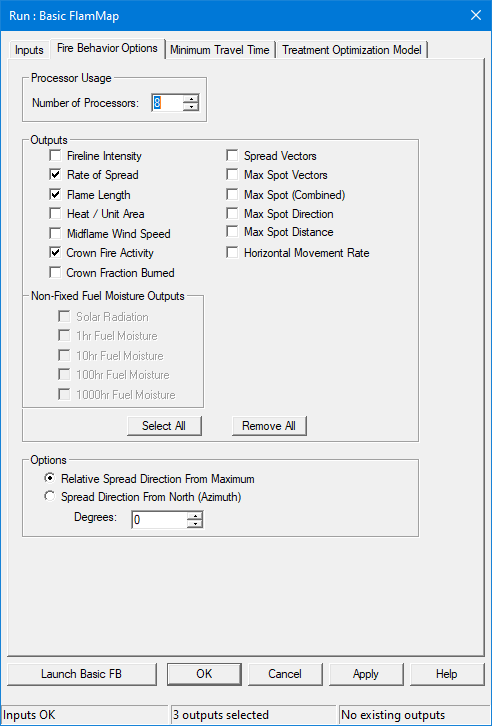
Select the Fire Behavior Options tab where you select the outputs you want FlamMap to generate . In addition there are two processing options you need to be concerned with.
Most computers have more than one processor, so you can limit the number used by FlamMap and do other things on your computer while your run is executing. Since this tutorial run is very small leave the Number of Processors spin box set to the default, which is the maximum number your computer has.
In the Outputs group box select the following check boxes;
These outputs are available only when a conditioning period is used, this is covered in the Variable Fuel Moistures advanced lesson.
Make sure the default Relative Spread Direction from Maximum radio button is selected in the Options group box.
Since you have selected options that will generate a valid FlamMap run, the Apply button is now available. Before any of the options in the "Run:" dialog take effect in a FlamMap run, they need to be applied. Click the Apply button and the Launch button becomes available and the messages on the status bar change.
Now your Fire Behavior Options tab should look like this;
Click to OK button in the "Run:" dialog to close it, if you have previously clicked the Apply button all the settings in the "Run:" dialog will be saved.
Even if you plan to continue now with this tutorial, you should save this project by following the procedures in the first lesson. Keep the project name "FirstTutorial.fmp".
The next lesson will finally generate maps in a FlamMap run.
