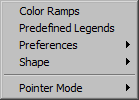
The Options menu provides tools to help manage your legends, the way themes are displayed, and saving vector themes you draw. These options are saved across all FlamMap projects.
|
The Options menu provides tools to help manage your legends, the way themes are displayed, and saving vector themes you draw. These options are saved across all FlamMap projects.
|
Color ramps are general color schemes that can be applied to any grid theme type. No value classes are defined in a color ramp. There are several default color ramps in FlamMap and additional ones can be developed and saved using the "Manage Color Ramps" dialog.
|
|
The Options > Color Ramp command displays the "Manage Color Ramps" dialog with all the currently available color ramps displayed. |
Clicking the Add New button puts a new grey single color ramp in the "Manage Color Ramps" dialog. You modify your new ramp by selecting it and clicking the Edit button.
Color ramps are modified by selecting a ramp and clicking the Edit button in the "Manage Color Ramps" dialog to bring up the "Select Ramp Colors" dialog.
|
|
The "Select Ramp Colors" dialog shows the current colors for the selected ramp in a "stack". A new ramp will only show the single default grey color. The Add Color button displays the "Color" dialog, select a color and click the OK button. The new color will be added to the bottom of the stack. Select a color and click the Edit Color button to display the "Color" dialog if you want to change an existing ramp color. To delete a color from the ramp, select it and click the Delete button. |
You can also move the colors around within the stack. The position of colors within the stack in the "Select Ramp Colors" dialog box will the same when applied to a legend. Move the colors up or down using the arrow buttons just below the stack.
|
|
Move selected color up one level. |
|
|
Move selected color down one level. |
|
|
Move selected color to the top of the stack. |
|
|
Move selected color to the bottom of the stack. |
The Delete button on the "Manage Color Ramps" dialog removes the currently selected color ramp from the group. If you delete a ramp by mistake, clicking the Cancel button will close the "Manage Color Ramps" dialog box. However, all of the changes made to color ramps since opening the dialog will also be lost.
Predefined legends are specific value class and color schemes for a specific grid or vector theme. Color ramps may seem similar but can be used for any grid theme type and no value range, classes, or units are included in color ramps. There are some default predefined legends in FlamMap and additional ones can be developed and saved with the "Predefined Legends" dialog. To open the "Predefined Legends" dialog select the Options > Predefined Legends command.

To manage predefined legends first select a theme type from the Theme Type: drop-down list. If any Predefined Legends are available for that theme, they are displayed in the Legends: text box. Remember, Predefined Legends are specific to the theme.

|
|
Once a Theme Type: is selected the Add New button is available. Selecting this button displays the "Create/Modify Legends" dialog where you create and save predefined legends. |
|
|
After selecting one of the available predefined legends the Edit button is available to modify it. Selecting this button displays the "Create/Modify Legends" dialog where you modify and re-save the selected predefined legend. |
|
|
After selecting one of the available predefined legends the Delete button is available to remove the selected predefined legend. |
Clicking OK will save all edits, new Predefined Legends, and deletions.
Clicking Cancel will not undo edits already saved with the "Create/Modify Legends" dialog or any deletions.
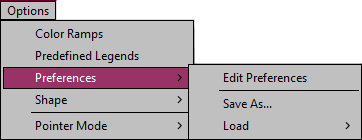 |
The Preferences menu has the commands to set and save how your legends look and themes are displayed. These preferences can be saved in a file and transferred to any other instance of FlamMap. |
In FlamMap the preferences are the default legends for displaying vector, contour, and grid themes. Selecting the Options > Preferences > Edit Preferences command displays the "Preferences" dialog. The defaults set in the "Preferences" dialog can be overridden for a single vector or grid theme by modifying the legend.

There are numerous tabs available for the input grids, output grids, output vectors, auxiliary vector themes, auxiliary grid themes, and application settings. Contour display preferences are also included on each grid tab.
For all but the grid theme tabs you can choose either a predefined legend or develop a legend starting with one of the color ramps by selecting the Use Predefined Legend or Use Color Ramp radio buttons.
To use a predefined legend select the Use Predefined Legend radio button and choose a predefined legend from the list. If no predefined legends are available for that grid type the Use Predefined Legend radio button is dimmed and unavailable. Predefined legends are never available for the Generic Grid tab since predefined legends are theme type specific.
If you select the Use Color Ramp radio button to modify a grid theme preference, you can change these display preferences;
Color Ramp: From the drop-down menu you select a color ramp, the default ramps and any ones you have created are available.
No Data Color: You can select a color for the No Value cells in your grid. Click on this box to display the "Color" dialog.
Units: Select the type of units for this grid theme from the drop-down list. For most grid theme types the choice is between English and metric units.
Decimals: Select the number of decimals you want displayed in your legend classes. Your choices are 0 through 9. Decimal places are very important on some of the output themes and meaningless on class or category grids.
Number of Classes: Using the spin box enter the number of classes (between 2 and 100) for your default legend.
Contour preferences are modified in the New Contours area of each grid tab. Clicking on the Color: box brings up the "Color" dialog. You select a contour style and width from the drop-down menus.
Selecting the Vector Themes tab from the "Preferences" dialog displays the default display preferences for point, line, and polygon shapefiles.

The Points, Lines, and Polygons sections are the same in that you select a style and width from the drop-down menus. Clicking on the Color: box brings up the "Color" dialog.
Contour preferences of color, style, and width are modified on the individual grid tabs.
The Application tab is the first (far left) tab in the "Preferences" dialog.
Here you set the disk location for FlamMap's working space. The default is the location FlamMap was installed in but if that location is short on space you can change it here.
The background of the main FlamMap window can also be customized to a different color or image.
DirectX is used for 3D viewing of your landscape and outputs. DirectX version 9.0b or later is required for 3D viewing. Windows 7 or later operating systems will have the most recent version of DirectX installed.
Whenever you exit FlamMap the current preferences, color ramps, predefined legends, and window positions are automatically saved to the FlamMap2.cfg file. When FlamMap is started the preferences, color ramps, predefined legends, and window positions are loaded from the last FlamMap6.cfg file saved.
You can also save a set of preferences, color ramps, predefined legends, and window positions as a separate Config (.CFG) File that will not change every time you exit FlamMap. This feature is useful to save separate preferences for different projects or users. The Options > Preferences > Save As command opens a "Save As" dialog box where you specify a file name to save the current preferences, color ramps, and predefined legends as a Config (.CFG) File. Do not use "defaults" or "FlamMap6" as these files already exist. FlamMap automatically attaches the .cfg extension to your filename.
Selecting the Options > Preferences > Load > Default Preferences command will change all the tabs in the "Preferences" dialog to the default FlamMap preferences, which are stored in the file "defaults.cfg". Any unsaved modified preferences will be lost. This command will not change any of your predefined legends or color ramps.
The Options > Preferences > Load > Saved Preferences command loads the preferences, color ramps, and predefined legends previously saved in a Config (.CFG) File.
 |
The Option >Shape sub-menu provides tools to help manage the vectors you draw.
|
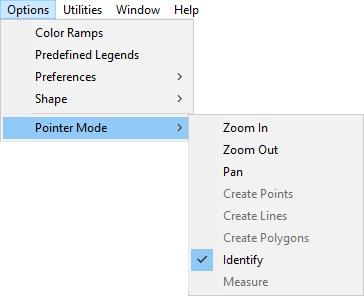 |
The Options > Pointer Mode command allows you to use the mouse cursor for zoom controls inside the "Display" pane. |
Selecting the Options > Pointer Mode > Zoom In command or the ![]() toolbar button changes your mouse cursor to the
toolbar button changes your mouse cursor to the ![]() icon when positioned in the "Display" pane. This pointer mode can be used in two ways,
icon when positioned in the "Display" pane. This pointer mode can be used in two ways,
Selecting the Options > Pointer Mode > Zoom Out command or the ![]() toolbar button changes your mouse cursor to the
toolbar button changes your mouse cursor to the ![]() icon when positioned in the "Display" pane. Clicking inside the "Display" pane zooms the display out by the amount set with the View > Zoom Factor command.
icon when positioned in the "Display" pane. Clicking inside the "Display" pane zooms the display out by the amount set with the View > Zoom Factor command.
Selecting the Options > Pointer Mode > Pan command or the ![]() toolbar button changes the mouse cursor to the
toolbar button changes the mouse cursor to the ![]() icon when positioned in the "Display" pane. Panning only works in a magnified mode when the landscape is larger than the "Display" pane. To use the Pan Mode to move your landscape around the display window click and drag the cursor in the "Display" pane. The landscape will then move with the cursor.
icon when positioned in the "Display" pane. Panning only works in a magnified mode when the landscape is larger than the "Display" pane. To use the Pan Mode to move your landscape around the display window click and drag the cursor in the "Display" pane. The landscape will then move with the cursor.
You can also move the landscape with the horizontal and vertical scroll bars on the sides of the "Display" pane.
Selecting any of the Options > Pointer Mode > Create... commands changes the mouse cursor to the driptorch icon and enters the Create Mode where you can draw vectors on the landscape to save as shapefiles and use as ignitions, barriers, or landscape masks.
Selecting Options > Pointer Mode > Identify or the ![]() toolbar button changes your mouse cursor to the
toolbar button changes your mouse cursor to the ![]() icon when positioned in the "Display" pane.
icon when positioned in the "Display" pane.
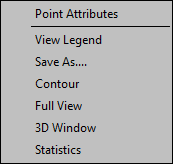 |
When in the Identify Pointer Mode right clicking in the "Display" Pane displays this shortcut menu. |
|
|
Selecting the Point Attributes command from the shortcut menu displays the "Point Attributes" dialog box. A Landscape tab is always displayed with the landscape and auxiliary grid values for the point (cell) that was right-clicked. You can also double-click a cell in the "Display" pane to display the "Point Attributes" dialog box. |
|
|
Any completed FlamMap runs have a separate tab which shows all the output values for the point (cell) you right-clicked. |
Select the View Legend command to toggle the legend for the "Display" pane on and off.
The Save As command opens a "Save As" dialog box where you can save the active grid in a variety of formats including;
The active theme to save can be from the Landscape File, an auxiliary theme, or one of the output themes.
The Contour command will display the "Contouring" dialog box.
Selecting the View > Full View command will scale the active grid to fit in the currently sized "Display" Pane.
Select the 3D Window command to create a 3D view of your display pane in a new window.
The Statistics command opens the "Theme Statistics" dialog for the active theme.
The Measure tool can be used to determine distances and areas on the Display Pane. Limitations include,
Selecting Options > Pointer Mode > Measure or the  toolbar button changes your mouse cursor to the
  icon when positioned in the "Display" pane.
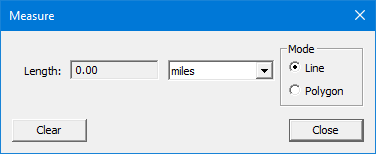
To measure length select the Line radio button, then left-click beginning and end points. Additional left-clicks will extend the current line.
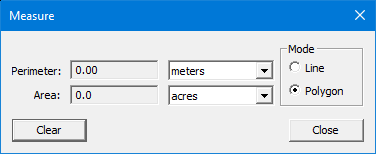
To measure area select the Polygon radio button, then begin a series of left-clicks. With the third left-click the polygon will close but continue to left-click to expand the polygon to the desired area.


