View Menu
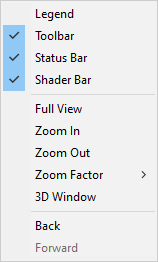 |
The View Menu consists of three sections;
- The first containing four toggles controlling the look of your "FlamMap" window, the check mark indicates the feature is currently displayed.
- The second section has five commands for controlling the view of the "Display" pane.
- The third contains Forward and Back commands to move back and forth between previous display views.
|
Select the View > Legend command to toggle the legend for the "Display" pane on and off.
This toggle displays or hides the Toolbar buttons. You may want to hide the toolbar to give more room for the "Tree" and "Display" panes. All the Toolbar buttons have equivalent menu commands.
This toggle displays or hides the "Status" bar at the bottom of the "FlamMap" window. The "Status" bar contains information about the "Display" pane in five fields;

- the current analysis area,
- the active grid theme,
- the value of the active grid theme at the current cursor location,
- the coordinates of current cursor location,
- the scale of the "Display" pane.
You may want to hide the "Status" bar to give more room for the "Tree" and "Display" panes.
The "Shader" bar controls the relief shading applied to the active grid theme in the "Display" pane. The "Shader" bar controls are;
|

|
Selecting this check box displays the active grid theme in shaded relief showing the topography with the sun angle and intensity. Clearing this check box turns off the shaded relief.
|
|

|
Changes the "sun" angle for the hill-shading. The hill-shading uses the values of the aspect grid theme for shading all active themes. The azimuth selected in this spin box will show as the legend color and aspects opposite this value will show as shaded or darker. Intermediate aspects will display proportionate shading to the azimuth.
|
|

|
This control changes how dark to shade the azimuth opposite that selected in the Azimuth spin box. It effectively controls the contrast of the hill-shading, with a value of 1.0 having the maximum contrast and 0.0 showing no shading.
|
|

|
When you change the Azimuth or Intensity spin boxes while Relief Shading is selected the changes do not immediately take effect. you need to click the Apply button to make relief shading changes to the display. When the Relief Shading is cleared, changes make to the Azimuth and Intensity spin boxes take effect as soon as the relief shading is turned on.
|
You may want to hide the "Shader" bar to give more room for the "Tree" and "Display" panes, but remember the relief shading controls are only available on the "Shader" bar.
The View > Full View command changes the scale of the active theme to display the entire theme in the "Display" pane.
The View > Zoom In command reduces the scale of the active theme by the percentage selected with the View > Zoom Factor command. You can also zoom in with the cursor in the Zoom In mode.
The View > Zoom Out command increases the scale of the active theme by the percentage selected with the View > Zoom Factor command. You can also zoom out with the cursor in the Zoom Out mode.
The View > Zoom Factor command sets the percentage of scale change for all of the "Display" pane zoom controls (Zoom In & Out toolbar buttons, Zoom In & Out pointer mode, and Zoom In & Out commands.)
|

|
Five percentages are available, the currently selected Zoom Factor is identified by the check mark. 10% is the default percentage if no factor has been selected.
|
3D Window
To use FlamMap's 3-D window Microsoft DirectX 9.0b needs to be installed on your computer. This is a free upgrade and can be downloaded from http://www.microsoft.com/windows/directx/default.aspx. When you start FlamMap it checks to see if you have the correct version of DirectX installed. If not, you can still use FlamMap, just not the 3D feature.
To open a 3D window select the View > 3D Window command.

The "3D" window that opens doesn't look like much at first but if you try out the following mouse moves you can get an interesting 3D view. Manipulating the 3D view works best with a 3-button mouse.
-
Hold down the middle button on your mouse to move the landscape around the window. First move the landscape into the middle of the window from it's default position against the left side of the "3D" window.
-
Holding the left mouse button and moving the cursor up and down will tilt the landscape so it starts to look familiar to you. Moving the cursor left or right will rotate the landscape.
-
Holding down the right mouse button and moving the cursor up and down will zoom the landscape in or out.
Its easy to get a 3D view something like this. You can also maximize the 3D view by clicking the maximize button on the "3D" window title bar. Auxiliary vector are not currently included in the "3D" window, this feature will be added in the future.

3D Options
You can control colors and lighting in your "3D" window with the "3D Options" dialog box. Select the Options > Options command from the "3D" window menu bar to display the "3D Options" dialog.
|

|
The Vertical Exaggeration: spin box can be set between 0.01 and 10.00 with 1.00 being the default. Setting a value of 0.01 give a almost 2D view while 10.00 creates a surreal image that's almost unrecognizable. The best values for viewing are between 0.50 and 2.00.
No one knows why Stu picked the wimpy blue default background color. But he did give you an chance to change it by double-clicking the Background Color: box to display the "Color" dialog. Dark grey or black is always a safe bet.
|
In the Lighting group box changing the Ambient Light Color: box can easily lead to strange results. Double-clicking the Ambient Light Color: box displays the "Color" dialog where you can select another color. Lighter colors (yellow or pink) will overwhelm the legend colors of the active grid theme. Darker shades tend to just tint the active grid colors. Dark grey or black is always a safe bet if you want to have the active grid colors displayed in the 3D view.
The Directional Light angles can be thought of the position of the "sun" shining on your landscape. The default Azimuth: spin box value of 225 (southwest) and Angle of Inclination: of 75 will imitate the summer afternoon sun at the mid-latitudes. With these defaults the highest energy (warmest)cells in the landscape will be the lightest shades while the lowest energy (coolest) are darkest. To get a good idea of solar radiation in the 3D view make your active theme all one light color before opening your 3D window. You can also create the 2D Solar Radiation output grid to provide radiations values.


