FlamMap can create several types of vector outputs depending on the type of run;
|
Run Type |
Vector Outputs |
|
Fire Behavior Outputs Tab |
|
|
Minimum Travel Time Tab |
Flow Paths, Major Paths, Arrival Time Contours, MTT Ignition |
|
Treatment Optimization Tab |
|
|
Farsite Outputs Tab |
Farsite Perimeters, Spot Fire Locations, Farsite Ignitions, Farsite Barriers. |
|
All Runs |
Vector outputs are selected from the Outputs sections of the Fire Behavior Outputs, Minimum Travel Time, Treatment Optimization Model , or Farsite Output tabs in the "Run:" dialog box. The Wind Vectors are always created when using one of the gridded wind options.
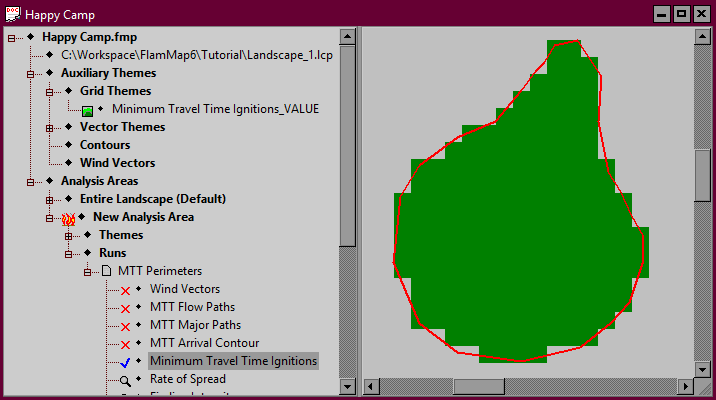
To temporally hide or display an individual vector output theme, simply double click it's line in the "Tree" pane. A blue check mark "![]() " indicates the theme is currently displayed and a red "X" indicates it is currently hidden.
" indicates the theme is currently displayed and a red "X" indicates it is currently hidden.
Right-clicking a individual vector theme item displays one of two shortcut menus.
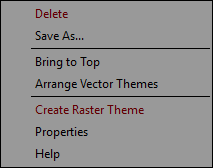 |
This shortcut menu is displayed for all vector outputs except for Wind Vectors. The Create Raster Theme command is only available for polygon outputs. |
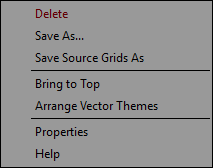 |
The shortcut menu for the Farsite ♦Wind Vector item differs in that it features the Save Source Grids As command. |
The Delete command is not available for individual run outputs. To change the outputs for a run select the desired outputs from the appropriate tab in the "Run:' dialog box, click the Apply button, the status bar will show "Existing outputs out of date", the re-launch the run.
You can save your vector or contour theme in shapefile format so you can use it in a GIS or other application. Right-click an individual theme from the "Tree" pane and select Save As… A standard Windows "Save As" dialog appears where you can navigate and name your new shapefile. If valid projection information is available for the landscape a Projection (.PRJ) File will be included.
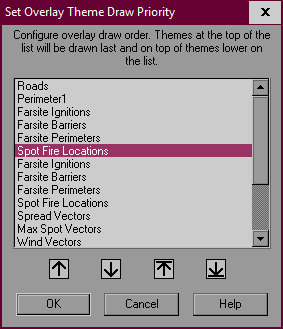
Selecting the Bring to Top command from the shortcut menu places the selected theme "on top" of any other visible vector and contour themes.
|
|
In the "Set Overlay Theme Draw Priority" dialog box select the first theme you wish to re-arrange. Then use the arrow buttons below the theme list to move the selected theme up or down in the stack;
|
♦Wind Vector outputs for a Farsite simulation are available when the Generate Gridded Wind from Weather Inputs option is selected on the Weather Inputs tab of the "Farsite Run:" dialog. These wind vectors are a compilation of all the different wind grids used in the run, one for each timestep. Only the individual wind cells used for each timestep perimeter are shown with the ♦Wind Vector item. You can save the entire set of wind grids from a Farsite run with the Save Source Grids As command, this creates two files, a multi-band GeoTIFF file and a XML file. The wind speed units in the saved GeoTIFF file will match whatever is selected in the ♦Wind Vector item.
These files cannot be viewed in FlamMap but can be viewed in a GIS and converted to single band GeoTIFF or ASCII files which can then be viewed as Auxiliary Grid Themes. The converted ASCII files can also be used as Gridded Wind Files in a FlamMap/MTT/TOM run.
For a polygon Output Vector Theme the Create Raster Theme command creates a raster (or grid) theme of the polygon. The new grid theme is visible as an Auxiliary Grid Theme where you can save it for future use.
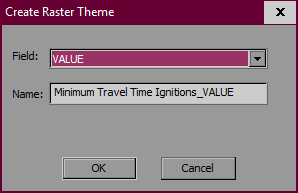 |
The Create Raster Theme command opens the "Create Raster Theme" dialog. |
The Field: text box has a drop down menu containing the attributes of the vector theme, one of these attribute needs to be selected as the value for each grid cell. The default Name: is the Field: (attribute) name selected appended to the vector theme name. Otherwise the user can enter any name for the new grid, no file extension is needed.
NOTE: This command is not available for point or line vectors.
The "Properties" dialogs for output vector themes are very similar to Auxiliary Vector Themes. They are documented in the Modify Vector Display topic.